Has your brick paver patio lost its charm? Over time, even the sturdiest patios can look dull due to cracks, fading colors, uneven surfaces, weather conditions, or the relentless growth of moss and weeds and more, leaving your once-beautiful outdoor space looking worn and damaged. But don’t worry! With the right tips for rejuvenating your brick paver patio, you can restore it to look new. In this blog, we’ll guide you through proven expert tips, from cleaning and re-leveling to repairing and sealing, that will breathe new life into your brick paver patio.
How Does Brick Paver Patio Damage Happen?
Weather Exposure (Rain, Snow, and Sun)
Weather is one of the leading contributors to the degradation of brick paver patios. Various weather conditions can cause different forms of damage:
- Rain and Snow: Excess moisture from rain or snow can seep into the joints between pavers, contributing to erosion or even moss and algae growth, which can affect the structural integrity of the patio. Prolonged exposure to water can also cause the freeze-thaw cycle in colder climates. When water trapped in the pavers freezes, it expands, causing cracks and an uneven surface as it thaws.
- Sun Exposure: Over time, constant exposure to the sun’s UV rays can fade the color of brick pavers. This leads to a weathered, discolored patio. UV degradation also weakens the integrity of the materials, making them more prone to cracking.
2. Natural Settling of Ground
Despite a patio being perfectly level upon installation, the natural settling of the ground beneath it can cause uneven surfaces. Over time, soil and underlying materials can shift, causing some pavers to sink or become misaligned. This settling leads to unsightly dips and bumps that can also create trip hazards.
3. Heavy Usage and Traffic
High-traffic patio areas, especially those subjected to frequent gatherings or outdoor activities, can experience damage due to constant weight and movement. Pavers may crack under pressure, and their edges might become chipped from frequent use. Additionally, heavy furniture, such as outdoor dining sets or BBQ grills, can lead to indentations or shifting.
4. Poor Installation
If the pavers are not laid correctly, with a solid base layer and proper edging support, they are far more likely to shift or sink over time. Inadequate compaction or failure to use appropriate base materials can cause instability.
Rejuvenating your Brick Paver Patio
Step 1: Clean Your Pavers Thoroughly
The first step of brick paver repair is a deep cleaning! Layers of dirt, moss, and algae can dull your patio’s appearance. Here’s how to clean it effectively:
- Sweep away loose debris like leaves and dirt using a broom.
- Power wash your patio! This will help remove tough stains, algae, and moss that are clinging to the surface.
- For stubborn spots, mix a cleaning solution using water and mild dish soap. Use a stiff brush to scrub away the grime.
Pro Tip: Avoid using harsh chemicals that could erode the material or harm surrounding plants.
Step 2: Re-level Uneven Areas
If you notice uneven or sunken pavers, you’ll need to fix their alignment:
- Start by removing the problematic pavers carefully with a flathead screwdriver or pry bar.
- Add or remove sand from the base layer to level the area. Make sure the surface is compact and even.
- Place the pavers back into position and use a rubber mallet to gently tap them into place.
Step 3: Replace Damaged Pavers
Cracked or chipped pavers can bring down the aesthetics of the entire patio. Here’s what to do:
- Remove any pavers that are too damaged to repair.
- Replace them with new pavers that match your patio’s design as closely as possible.
- Ensure the new pavers are securely installed and level with the surrounding ones.
Step 4: Re-sand the Joints
The sand between your pavers (called joint sand) plays a key role in holding them in place and preventing weed growth. Over time, it may wash away, so here’s how to refresh it:
- Sweep polymeric sand into the joints between the pavers. This type of sand hardens when activated with water, creating a durable bond.
- Use a broom to evenly distribute the sand into the gaps.
- Mist the surface lightly with water to set the sand.
Step 5: Seal Your Patio
Protect your pavers with a sealant! Sealing offers several benefits:
- It prevents dirt, moss, and algae from taking hold of your pavers.
- It enhances the color and reduces the impact of UV rays.
- It provides a protective barrier against water damage.
Make sure to use a sealant designed specifically for brick pavers.
Step 6: Add Finishing Touches
Now that your pavers are all settled, it’s time to decorate:
- Add potted plants or flowers to bring bursts of color to your outdoor space.
- Use outdoor rugs and cushions to create cozy seating areas.
- Install solar lights along the edges to highlight your patio’s new look, even at night.
How Professionals Can Help
1. Comprehensive Assessment
Professionals are trained to identify underlying issues that may not be immediately visible to the untrained eye. Here are the common issues:
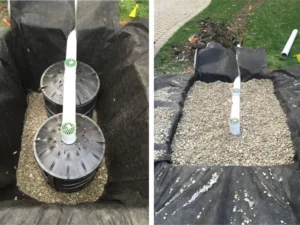
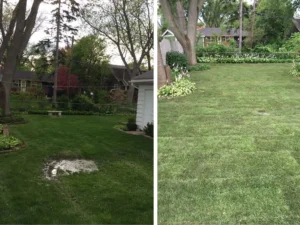
- Drainage Problems: Poor drainage can lead to water pooling, erosion, and the growth of moss or algae. Experts can evaluate your patio’s drainage system and recommend solutions to prevent future damage.
- Ground Settling: Significant ground movement or settling can cause uneven surfaces. Professionals can assess the extent of the issue and determine whether re-leveling or more extensive groundwork is required.
2. Cleaning
For cleaning and maintaining the brick paver patio, hire the professionals! They are equipped with high-powered pressure washers and specialized tools that can remove tough stains, dirt, and moss more effectively than consumer-grade equipment.
3. Paver Repairs
Damaged or misaligned pavers not only affect the look of your patio but also pose safety risks. Professionals can precisely handle brick paver repair to restore its appearance and functionality. Here is what they do:
- Paver Alignment: Professionals can re-level the pavers correctly, maintaining a smooth and even surface.
- Replacing Damaged Pavers: They can source matching pavers and install them, preserving the uniformity of your patio.
- Re-Sanding Joints: Experts use polymeric sand to fill gaps between pavers, which hardens upon activation with water to provide long-lasting stability and prevent weed growth.
4. Sealing Application
Sealing your brick paver patio is important to protect it from weather damage. When done professionally, it helps your patio last longer, prevents stains, and keeps the colors intact. Here’s how professionals get it done.
- Surface Preparation: Professionals thoroughly clean and dry the patio before sealing.
- Even Application: Using sprayers or rollers, they apply sealant evenly, avoiding streaks or uneven coverage that could compromise protection.
To wrap Up
By following these tips for rejuvenating your brick paver patio, you can bring it to life. If you’re not sure where to start or you’re ready to call in some extra help, don’t hesitate to reach out to paver patio contractors at My Landscapers Contractors. With our expertise in brick paving, permeable paving, and yard drainage services throughout the Western suburbs of Chicago, we can help you create and maintain your patio. Our dedicated team is committed to delivering high-quality hardscape designs that will not only meet your vision but also withstand the test of time. Contact us today for a consultation, and let us help you out!